Wednesday, July 18, 2012

Isabella Turns 2!

We got a little behind on planning/sharing Isabella's upcoming birthday because we had a really busy June (more on that later) and so, it was quickly decided, that with temperatures reaching 105, we should probably have a pool party and keep everyone as cool as possible!!

As soon as all of the littles arrived, it was right to playing in the water!

At this point, everyone is thoroughly soaked and having a blast running around and squealing!

After playing in the water, the kids had fun munching on great grilled goodies and perfect cookout foods!  Then it was time to play in the pool.

After playing in the pool a while, we (read: Momma) were ready for some cake!!!
two little finger prints in the bottom of the 2

Isabella was so anxious to touch her cake she stuck her two little fingers in the 2 before we could even sing "Happy Birthday" to her!  :)

Once we started singing "Happy Birthday" she decided she wanted to be really shy!  Who knew?! :)  This is certainly not the norm!
Shy little birthday girl!

Warming up a little bit. :)
After that, it was all bets off.  She dove right into the cake and Daddy *might* have dunked her face in the cake.  :)  Olivia came over and had a taste or two of the sweet icing.

That's right honey, you dive right in!

She was so sweet, once she had her fork, she immediately started sharing her cake (i.e. feeding the cake to her) with Olivia! She would put a bite in Olivia's mouth and say, "Mmmmm!" then repeat over and over.

While Olivia and Isabella were sharing cake, Alec decided he was going to stick a couple fingers in the big rainbow cake!  He was almost instantly caught by the surrounding adults! bahahaha! :)

By the time gift time had rolled around, she was really good about opening the presents.  She opened each card, "read" it, handed it to me, then pulled the wrapping paper off!  Any time she got an outfit she would hold it up and say, "Ooooooh!" which made all of the adults laugh!

We had a wonderful time celebrating Isabella's 2nd birthday and catching up on each other's lives!  Thank you so much to everyone that came on such short notice, Isabella is so blessed to have such a loving extended family!  I hope those of you that weren't able to make it enjoy this little peek into her birthday party!  :)

Be Blessed.

Thursday, July 12, 2012

Decorating: Rustic, Vintage Yellow and White

This year I decided to decorate Isabella's 2nd birthday party using a rustic, vintage yellow and white theme.

The party was an outdoor cookout and pool party, so I didn't want to go too overboard, but I really had some great ideas flowing and I am not one to just "throw a kids party."

Those of you that know me know I will try anything crafty once, if I think it will be pretty. :) I wanted white flowers, but I didn't want to buy them (let's face it: on a day that is pushing 105, how long would a real flower last, without wilting into oblivion?) I am very serious about repurposing items, so I was thinking how could I make them? Ah Ha! Remember those paper flowers we used to make back in the day? Well, why not!?

So I set out Googling tutorials on how to make tissue paper flowers. A task which I thought would be insanely easy during the time of Pinterest and other Martha Stewartish websites, but alas I was incorrect. You could find plenty of pretty pictures on Pinterest (not what I use the site for- I want tutorials on how to make the pretty things) and everything I found on Google lacked pictures. I have learned something about myself in my old-aged wisdom: I like to make things by a tutorial with pictures, therefore I must be a visual learner (I AM a photographer and a teacher by trade).

I clicked back and forth between a few websites and their hard to follow directions and created the following flower. :)

I wanted a large, white hydrangea type flower, and searching with that as a key word wasn't much more help, so I went back to the least confusing site and modified the suggestions. Here are my simple steps, with pictures :) to make a large, fluffy, full flower!

What do you need?
Tissue paper package (40 sheets work good for a party)
Silver floral wire
Green floral wire
Sticks from the yard (remember rustic and repurposing??)
Pine tree dried sprigs (see finished picture)
Burlap wrap
Small and Medium sized pinecones
Scissors

1. Cut 10 tissue papers in 8 inch by 10 inch "squares". I was able to get 4 sets per sheet out of the pack I bought, but this will vary depending on the shape and size of tissue paper packets you buy.


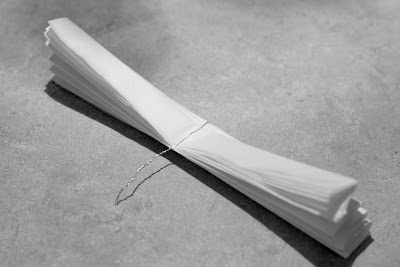
 2. Fold the tissue back and forth in 1/2 inch width.


3.  Wrap silver floral wire around the center of the folded tissue paper and twist tie the stem of the wire.


4.  Round cut the edges of your folded paper.


5. Begin pulling the tissue sheets apart on each side, one by one, while the side is "fanned" out. Be careful with this step or you will tear the tissue.

6. After both sides are fluffed, make sure the flower is nice and round, adjust and squish accordingly.

7. Using the green floral wire, secure the flower's silver wire tail to the stick you previously found in the yard. Trim stem as necessary and re-fluff the flower so it looks fabulous!

8. Place flowers in Ball Jar vase and display for all to see! I found that 4 flowers filled the jar fully, but you could do 3 flowers and let them hang loosely in the jar.

9.  Add a couple of sprigs of dried pine branches for dimension and depth.

Notes:
To change the flower, just cut the ends differently to resemble the petals of the flower you are mimicking.

Cut the tissue squares smaller if you want smaller flowers.

Also add a splash of color to the center of a flower to jazz it up a bit. Be sure this color stays on top of your flower as you spread the sheets apart.


~~~~~~~~~~~~~~~~~~~~~~~~~~~~~~~~~~~~~~~~~~~~~~~~~~~~~~~~~~~~~~~~~~~


Now you are probably asking: "Hey, Sarah, where's the yellow!?"

I love using fruits and vegetables in my decorations (the annual white pumpkin vase has been a Thanksgiving family request for the past 4 years- thanks Martha Stewart Magazine for another great centerpiece that lasts a long time!) and I hadn't used lemons in a while, so what better to do than to use them in these decorations?
In the bottom of the Ball Jar, I cut lemons into slices and filled the bottom of the jar, so the lemon slice was facing out all around. It took about a lemon and a half to complete each Ball Jar to the fullness I desired. Keep in mind I didn't use the ends or any slices that weren't full and lemony looking. :)

Add a little water and they float beautifully. :)

Here's the finished product!
Guest dining table decoration.

I loosely and freely wrapped some burlap on each of the tables and added a handful of medium and small pine cones I picked up in the yard (remember that repurpose idea?  :)  ) around the vase and burlap to tie in the rustic, vintage feel I was going for!

One of the centerpieces for the Hor Dourves Table.
I am happy to report that the lemons last a REALLY long time, so to can use this centerpiece for several days without changing it out or the "flowers" going bad!! Plus, even better, it makes my house smell so summery and perfect. :)


Enjoy.

Wednesday, July 11, 2012

Lancaster Central Market

Lancaster Central Market.
Meet me at the market!

This Farmer's Market in Lancaster, Pa is a foodie's dream!

My little family and I decided to take a quick road trip to the Central Market in Lancaster. It is the nation's oldest, continuously running Farmer's market in America and CNN GO just raked it 8th among the world's best Farmer's markets. Not too shabby for central Pa!

You can read the full PennLive article.

Also, read the full CNN GO article.

The market is located in downtown Lancaster and public parking is readily available in several locations only a block or two away from the market. There are a lot of art and specialty shops surrounding the market and you could easily spend an entire afternoon browsing the cobblestone and brick lined streets, weaving in and out of the various and sundry unique shops lining he streets. There are also plenty of local restaurants to grab a quick lunch at while browsing the shops, but who was I kidding? I was saving up for the delectable treats awaiting me inside Central Market!
Handmade Italian Pastas at The Herb Shop.

The market itself contains almost 75 vendors from all walks of life- literally. The vendors range from authentic African cuisine at Rafiki's to Amish meats at S. Clyde Weaver to hand rolled pastas and dried herbs at The Herb Shop. There are also several fresh flower vendors and a large variety of organic, grass fed, and natural vendors- ranging from meats, coffee, vegetables, goat cheeses and more! In other words, a foodie's dream!! See the complete directory of shops on the Central Market website!
Lancaster Central Market includes a variety of food and floral vendors.

The market is only open on Tuesdays and Fridays 6-4, and Saturdays 6-2. There are additional days around Thanksgiving and Christmas, so check the schedule.

You can read more about the market and it's history on the official website.
Shrip Wrap from Mr. Bill's Seafood

To satisfy my foodie's dream, I picked up a shrimp wrap, made with cilantro, celery, lettuce, and rice, along with a special fresh herb blended dip, and it was fabulous, all for $8.50!!  It was the perfect little lunch wrap, so I can see why so many visitors wait in lines during their lunch hour to feast at the Central Market!
 
For anyone traveling to the area or through central Pa, I would recommend the visit! It has a lot of history that most Americans don't know (outside of central Pa), great healthy food choices and fabulous atmosphere. There has to be a reason why so many business people in suits and ties, dresses and heels, choose to frequent the market and stand in lines for Lobster Wraps and Rolls, S. Clyde Weaver sandwiches and subs in Tuesdays and Fridays year after year. Come see why for yourself.

Note:  All photos are IPhone photos.  Where can you travel with your IPhone?